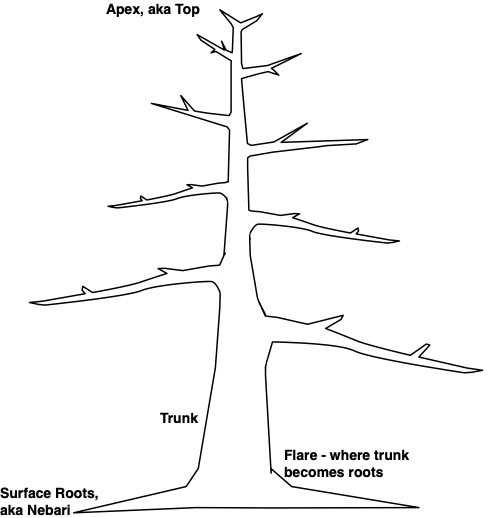
Bonsai Lifecycle
When beginning the hobby of bonsai there’s a lot to learn. How to repot, how to wire, how to cut candles on a pine or prune a maple. We can get in a hurry to accomplish something and forget that bonsai is a hobby that celebrates gradual change and refinement. Starting out in this hobby we usually work on younger trees because they’re easier to acquire – and cheaper. That’s great because no one wants to wreck or kill an old and valuable tree. But doing advanced stage work on a tree before earlier phases have been completed will likely leave you with an unsatisfying result. Reducing the size of needles or leaves on a tree that has a skinny trunk and no taper almost guarantees that the trunk won’t improve much over time.
Trees go through several phases in their lives which may be decades or longer. This article discusses the different phases, how to recognize them and what we’re trying to achieve in different phases as we develop our bonsai.
So practice on younger trees but after you’ve learned the basics focus your work on doing work that’s appropriate to the stage that a tree is in. If you’re not really interested in working to develop a trunk, that’s fine – you can buy an older tree from a bonsai nursery or from club members who have too many trees. You’ll know what to look for when evaluating a tree to buy.
Beginning – Seedling Phase
Most plants that we use for bonsai will start out life in a commercial nursery. There new plants will be grown from seeds, or frequently from cuttings made from mature trees. The goal of a commercial nursery is to quickly grow a healthy plant that can be sold at a garden center. The soil mix used is often primarily fir bark. It, puts a handful of fertilizer provides support and nutrients to the growing plant – and is cheap. After about five years there’s not much left, but by then most of the trees will be planted in someone’s yard or office complex.
The tree may start out as a seedling in a 4-inch pot. When it reaches 4-inches or so tall it is considered a sapling and up-potted to 1 gallon. When it outgrows the 1-gallon pot it will be up-potted to a 5-gallon and maybe even larger size pot as the tree grows.
When buying a tree from a nursery to turn into a bonsai you need to find trees that show some age. For guidance check out Finding Bonsai Material at the Nursery.
Below are example of young and old pine trees. (placeholder images)
Trees for sale as bonsai are usually somewhere in between these two extremes. Trees without a lot of roots or with a skinny trunk are ready for Development Phase.
Development Phase
It might be easier to think of this as “phase when we develop the trunk.”
During this phase you want to encourage rapid root growth and rapid upper tree growth. Trees with a thicker trunk and roots that flare out from the trunk indicate an older tree. To achieve this appearance you first want your tree to grow wild. Long vigorous branches require more nutrients to be transported from the roots via the trunk so those will grow larger. That supports lots of foliage which produces more sugar that the tree can use to grow larger roots, trunk and branches.
To enhance growth during this phase you’ll use a special soil recipe to be sure that the tree roots get as much oxygen as possible – see Soil Basics for Development Phase Recipe. And lots of fertilizer – see Fertilizer Basics. Also, you won’t be pruning for a couple of years to allow the tree to grow as rapidly as possible.
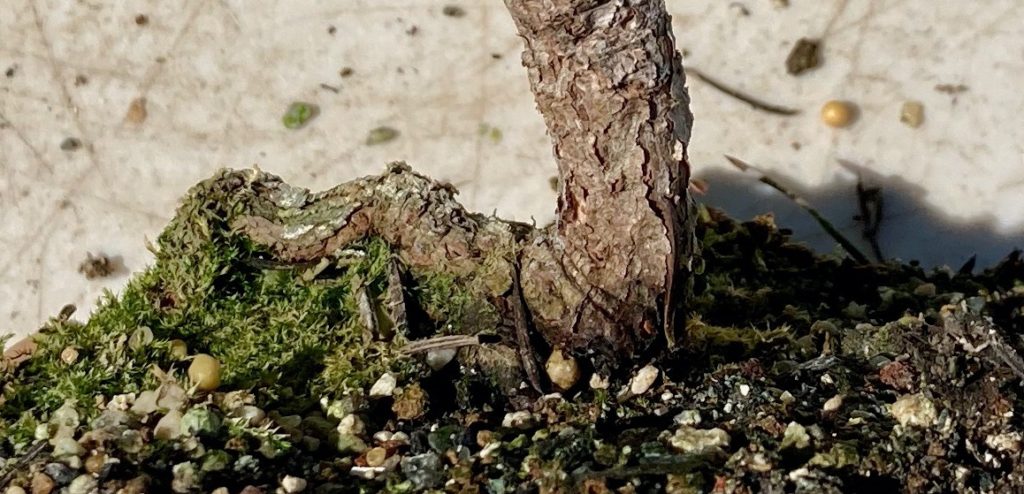
Begin by transplanting your tree at the appropriate time of the year – usually January to March. This is the one time you should remove all soil from a tree – aka barefoot. You don’t want any old nursery mix remaining in the new pot. You should repot in a large pot so the tree has room for roots to grow, but it will be better if you don’t use a nursery pot. Instead use a pot that’s wider and shallower to help develop surface roots. You can find a “bulb pot” at some nurseries but for larger trees you’ll need a Japanese grow pot.
A tree that has a trunk diameter of 1″ at ground level should be planted in a pot that’s at 3 to 4-inches deep and a bit wider than the tree’s widest branches. Alternatively you might plant the tree in the ground for faster growth.
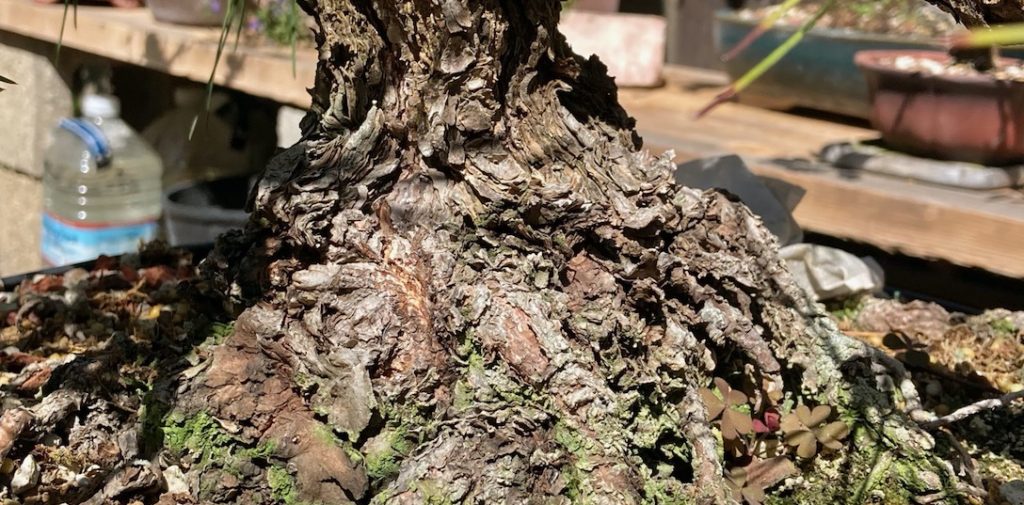
Developing a Taper
You also want develop taper in the trunk – that is a larger diameter near the roots vs. at the top. To develop this you’ll prune branches near the top of the three – but only once the top is the diameter you want. Allow the lower branches to grow wild. After another year or more the bottom will be larger diameter than the top. When it looks good to you the tree is ready to begin Refinement Phase.
Refinement Phase
Although the trunk’s growth is mostly complete now it will continue to develop bark and other indicators of age. During this phase you’ll be working to refine the branches of your tree. Initially you need focus on developing good branches. We begin by removing branches we no longer need and dramatically shortening the ones we have. Chosing which branches to keep and which to remove will vary depending on the style you’re trying to achieve. To see an overview of different styles available see Tree Style Basics. The best time to remove branches is before the tree starts the spring push – so January to March.
You may decide that the remaining branches need to be a bit fatter. If so, then use the same technique that was used to fatten the trunk – let it grow wild for a while and then cut off the excess.
Branches Are Fat Enough
When the branch is fat enough you’ll remove unneeded growth and force new growth. But you also want to make other changes – including repotting into soil that promotes finer growth rather than fast growth. This should happen when the tree is dormant, usually February to March. See Soil Basics for Refinement Phase Recipe. When repotting you’ll move from a grow pot to a bonsai pot for the first time.
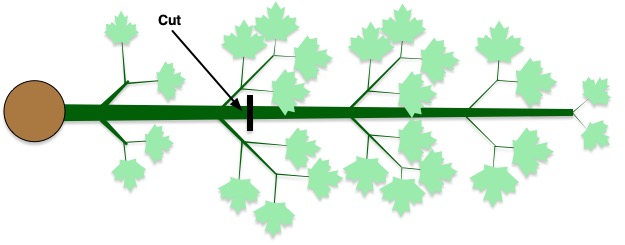
Most trees that have been growing wild will have long internodes. We want to replace those long internodes with shorter ones. To achieve this you’ll cut each branch back to the second set of buds on the branch and let it grow.
After another year you’ll remove part of that growth and continue to refine the shape of the branch. This includes wiring for the first time. Pruning techniques vary for different tree species so see articles such as Black Pine Basics, Maple Pruning Basics, etc.
Wiring and Pruning
Wiring and pruning are key techniques used to refine the shape of branches. Although wiring is much the same for all trees, there are some variations. For example, faster growing trees like maples are usually wired using aluminum wire instead of copper because aluminum wire will move a bit as the tree grows and less chance of marking the bark. Wires on deciduous trees should be checked every month so it can be removed as soon as marking begins to happen. Copper is always used on pines and junipers and usually stays on for 3-months or more.
Pruning varies depending on the species and is done for a couple of purposes. First is just to keep the tree from getting too large and looking like a shrub. For this you’ll remove growth at the ends of branches. You’ll also remove growth that’s in the wrong place – like underneath an existing branch, or going straight up. But you’ll also prune to reduce the size of internodes – also known as the space between branches. And you’ll prune to reduce the size of leaves or needles, because smaller size leaves will look more in scale with a small tree than larger ones. We have articles on all of these techniques.
Conclusion
Once your tree is in the Refinement Phase you’ll continue to improve it by pruning away unneeded branches. Or, keeping it compact by pruning the tips. You’ll wire major branches only occasionally as you decide to restyle, but will fine wire tips of branches every year. You’ll repot every few years so that the soil continues to drain well – and draw in oxygen which is needed by the roots. But you’ll do this less frequently, and probably never barefoot the tree again. The soil recipe will shift a bit again – more Akadama and less pumice.
You’ll spend less time doing major tasks and more time refining – and enjoying your tree.