Maple Pruning Basics
Maples grow very rapidly and a tree that looks great in early spring can be completely out of shape a week later. This article discusses how to do basic pruning to keep a maple looking good.
Although this article is written about maples, the information is generally applicable to all deciduous trees.
Assessing Your Tree’s Shape
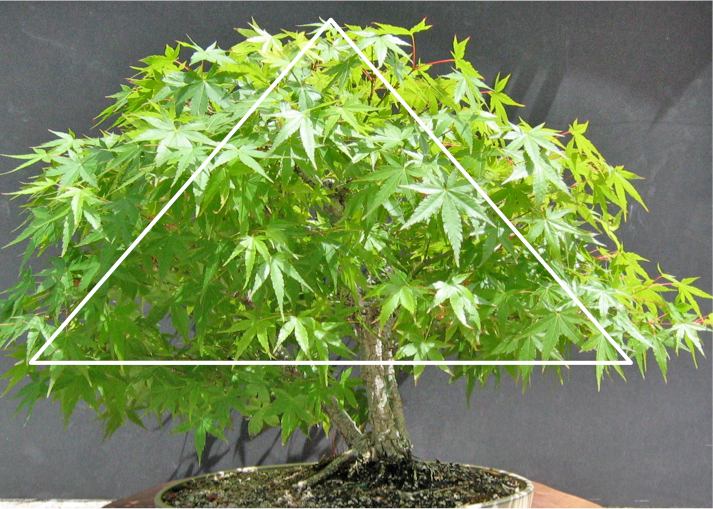
Study your tree. If you haven’t pruned it lately it may look like this – bushy and green, having lost it’s shape. A bonsai should be roughly triangular shaped.
This one clearly isn’t and needs to be pruned.
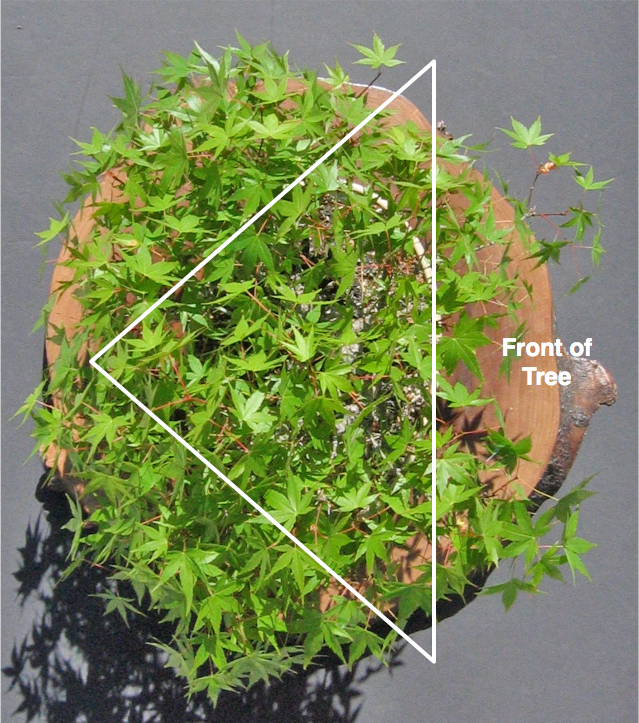
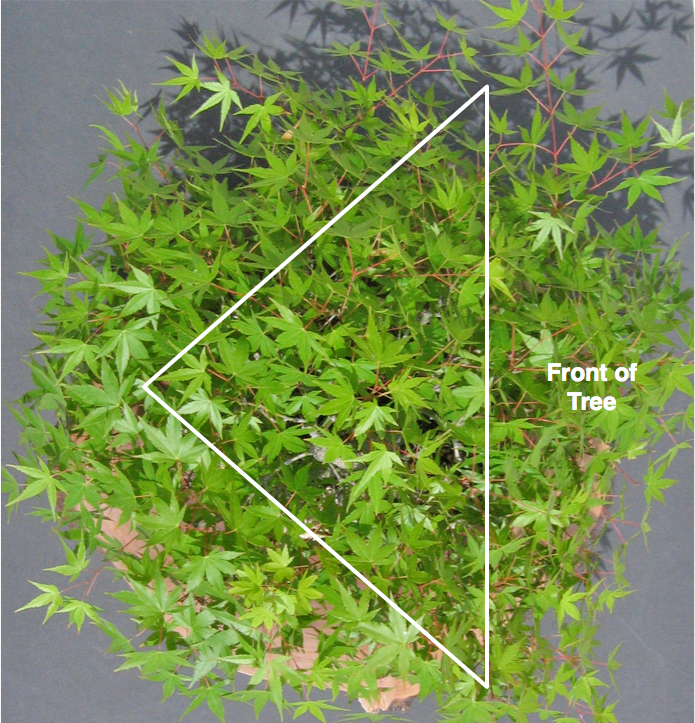
When looking down from the top the tree should also be roughly triangular shaped.
For this tree the front of the tree is on the right side of the picture, so the base of the triangle is there as well.
In addition, the triangle shouldn’t be centered over the tree, but offset towards the back of the tree – so there are more branches at the back of the tree than the front. This tree looks more like a circle.
First Steps
The first thing to do is carefully shorten all the long branches, using the instructions below.
Let’s look at a branch. You’ll see that the leaves are attached to the trunk in pairs as shown in Figure 3. Alternating pairs are arranged 90” from the previous pair. In the picture below there is a branch the splits left and right. The first set of leaves past the split go up and down. (For clarity one UP and one DOWN leaf have been removed.) The next set of leaves past the up / down pair now go left / right.
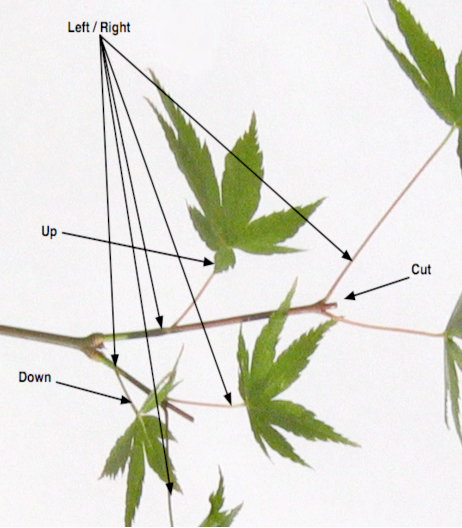
When pruning we want to encourage branches to go left / right, instead of up / down. We cut off long branches so that the last leaves on the branch are going left / right. Buds at the base of these leaves will become new branches. We also cut off leaves that are going down. This helps make it easier to see the branches, and makes sure that they won’t develop into branches going down – which we don’t want.
Another goal of pruning is to shorten the internodes – that is the space between leaves. If you think the leaves are too far apart, you can cut back all the way to the buds. There is a circle of buds at the base of each branch. When you cut the stem off like this new branches and leaves will sprout from the buds.

Reduce Branch Size
When you look at your branches you will probably see that many branch are about the same thickness from beginning to end.
It will look more natural if the branch starts out think and becomes thinner over its length. Here’s how to do this.
Look for branches that are heavy but with a slightly smaller branch that can take over the duty as the main branch. Cut off the heavy branch like shown here.
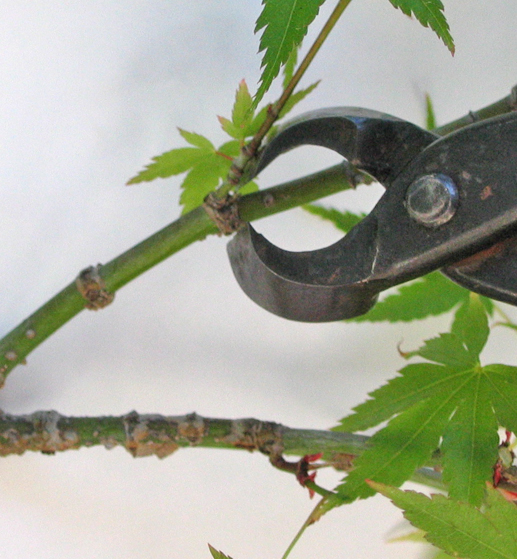
Here’s what the branch looks like afterwards. It may seem like a significant difference in size now, but the smaller branch will grow a bit in diameter and the difference will smooth out.
Notice the rings of buds at the base of this branch. We could cut this branch back to one of those rings and have a shorter internode. Also look at the branch at the bottom of Figure 7. It has a branch coming out the bottom. That should also be cut off.

Crossing Branches
You should also look for branches that cross another one. You want to remove those, but you first have to decide which one. Here are a few hints:
- When a branch comes out the bottom of another branch, remove it
- When a branch has longer internodes, remove it
- When a branch is going the wrong way, remove it
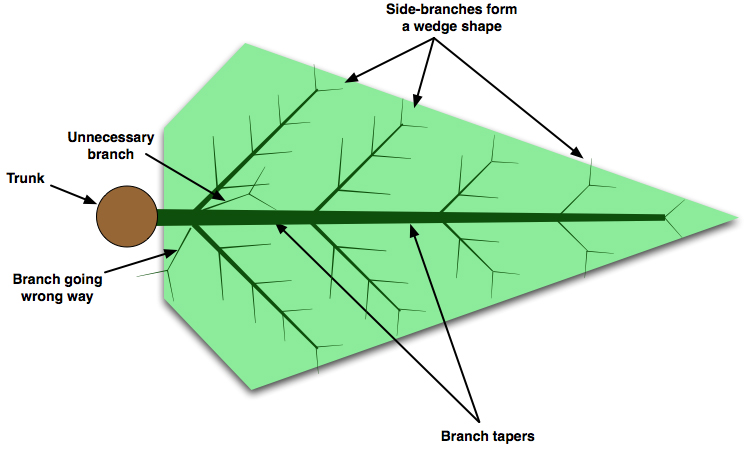
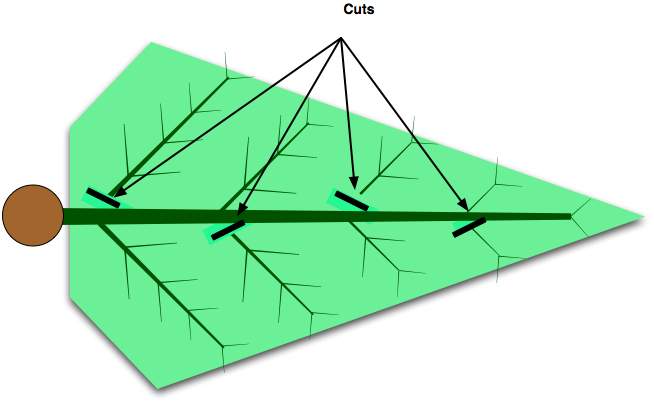
Shaping Branches
We want each branch to be shaped like an arrow-head. But this branch has some issues. For example, a branch coming out of the “crotch” of two other branches (labeled Unnecessary branch above). There’s also a branch going the wrong way. All branches should be headed away from the trunk. These should be cut off. Side branches that are too long should be cut back to the overall shape of the branch is an arrow-head.
Later Stages
After the basic shape of a branchhas been established and has been growing successfully for a few months we will want to remove some branches.
That will mimic what happens in nature – introducing a bit of randomness. It will also open up the tree a bit, which lets light into the center of the tree. That will look good, and it causes other buds to start to grow.
Of course you branches shouldn’t be straight lines as shown in these figures. They should be curved and kinked – as in nature. Cutting branches like this will do some of that, but most “movement” comes from wiring, which isn’t covered in this article.
Final Inspection
Now all the long growth has been removed from this tree. You can now see the trunk from the roots up to near the top of the tree. You can also see the major branches.
It is closer to a triangle than when I began, but as you can see there’s a lot of growth that’s still outside the triangle.
Every few minutes look at your tree and visualize its shape as a triangle. Notice that triangle is now tilted to the left, as compared to the first photo That’s because the initial shape is boring because all the sides are the same size.
This new triangle leans in the direction of the tree’s movement – to the left. The bottom of the triangle on the left is where the lowest branch is. The bottom of the triangle on the right is where the lowest branch on that side. And the top of the tree is roughly where the top of the largest tree is.
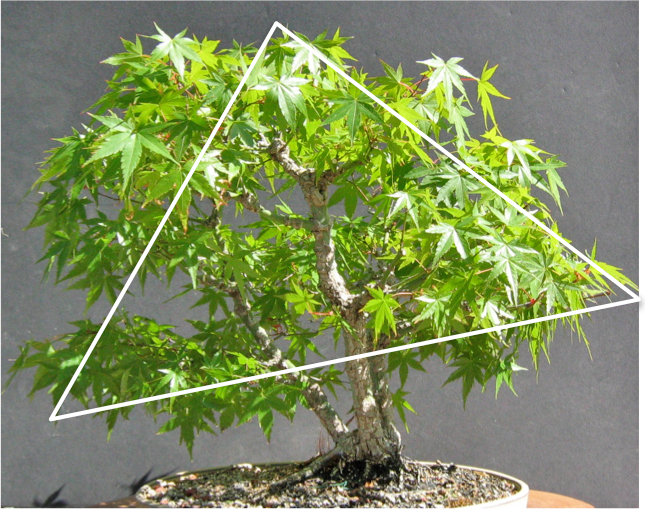
The last photo shows the front of the triangle is flatter – and closer to the trunk. That’s why you can see the trunk and branches. Again, the tree is larger than this triangle, but the branches are shaped such that it can’t be much smaller without dramatically reducing the length of the existing branches.
Another alternative is to grow the tree a couple of inches larger so we have a larger triangle. That’s what I’m going to do.
It’s a good idea to make a sketch of your tree and indicate the triangle. Keep it for the next time you prune the tree as a reminder.