Building a Bench to Display Your Bonsai
By Michael Greenstein
As you acquire more than a couple of bonsai you need a place for them to live. Leaving pots on the ground makes it easier for bugs to find their way into your bonsai and makes it difficult to see your trees. Putting them on a bench makes them easier to water, to inspect for things you need to do (like weed or remove wire) - and makes it easier to look at your trees.
This article describes my experiences building benches for my bonsai using redwood decking and cinder blocks. The basic idea is to use the cinder blocks as a base that will withstand damp conditions, and redwood decking with an air gap between the boards to promote air circulation and prevent water accumulation on top of the bench that leads to rot. These benches will last over 20 years with daily watering / rain in the SF Bay Area. No chemical treatment is used on the wood. The benches can be designed with various lengths. I typically use 8 or 10 ft just as it comes from the lumber store.

Materials
2 x 6 redwood decking sized to the length of the bench you want; try to avoid boards with too many knots, and find at least one good surface for the top
2 x 4 redwood decking to connect the 2 x 6 boards together underneath
8 x 8 x 16 cinder blocks (hollow), available at garden supply stores
#10 x 2-1/2 inch Exterior deck screws with powder coating (a 10 ft long bench with 3 boards and 4 cross pieces requires 24 screws)
Tools
Power radial or hand saw to cut 2 x 6 and 2 x 4 boards as necessary
Power drill / driver to drill guide holes for the screws in the 2 x 4 cross pieces and to drive the screws into the 2 x 6 boards.
Tape measure and wooden pencil to mark lengths for cutting
Level for bases and bench
Procedure
For benches that are less than 8 ft long, two cinder block bases are enough. For 10 ft benches three bases are recommended.
Lay out 2 x 6 boards in a set of 3 or 4 boards wide. This guide will discuss 3-board width benches, but can be adapted to 4-board wide benches.
For illustration, a 3 board wide, 10 ft long bench is described below.
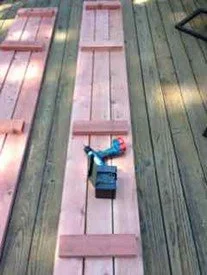
Lay out the 2 x 6 boards in parallel with about a wooden pencil (1/4 “”) width gap between the boards on a flat surface. This is important for drainage. Lay the best side of the 2 x 6 boards face down to eventually become the top of the bench. The photo below shows the boards with a pencil sized gap, and an assembled cross piece (bottom view).
Cut 2 x 4 cross pieces to a length 2 ‘’ less than the width of the final bench as laid out with the gaps between boards. The length of the cross pieces is not critical, but if it is less than the bench width, then it will be partially hidden from final view. For a 3-board bench of width 17”, the cross pieces should be about 15” long. For a 4-board bench of width 23”, the cross pieces should be about 21” long. It is more efficient to cut and prep all of the cross pieces in advance.
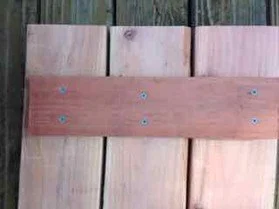
Position the cross pieces to avoid the cinder block bases when the bench is sitting on top of the blocks. For 3 bases, you will need 4 cross pieces (shown right). Think carefully where the bases will go. I have found it convenient to place the outer cross piece about 2 inches beyond the outside edge of the cinder block base.
Drill 5/32 “ guide holes in the 2 x 4 for the connecting screws; two holes per board so there is no rotation of the boards in the bench. Don’t skip this guide hole step, or you will risk splitting the cross piece near the ends.
Drive #10 x 2-1/2 “ screws through the 2 x 4 cross pieces and into the 2 x 6 boards. Using external screws with powder coating will add 5 years to the bench. An example of these screws from Home Depot is shown below. Seat the drill bit well to avoid stripping the screw head and accelerating the screw rusting.


After all the cross pieces are screwed into the 2 x 6 top boards, the bench top is assembled. Flip it over. This method hides the screws from view.
Position the cinder blocks as required. A reasonable height is 3 cinder blocks high. For a 10 ft bench with 3 block bases, this is a total of 9 blocks. I have set up benches with blocks 2 high and also 4 high. Make sure the cinder blocks are level and stable, before adding the wooden bench.
Note that if the entire cinder block stack is arranged to appear solid, then there is a straight hollow path from the ground to the bottom of the bench for bugs, slugs, and spiders. So, rotate at least the top block to reveal the open core and block this path up to the bottom of the bench.
Position the bench on top of the cinder block bases. Check that the bench is level and stable, and also that the bench is symmetric on the block.
Optionally, you can chamfer the front corners of the bench for a softer look
The redwood will silver out after a year of sun and water.
Enjoy the bench for many years!


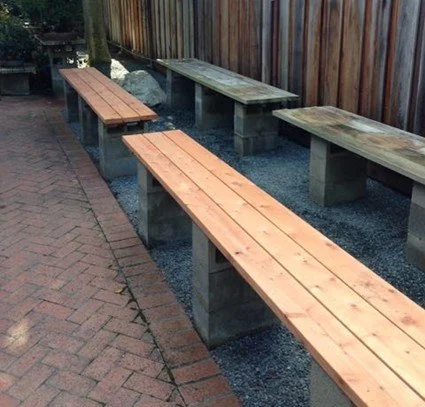
New, 3-board benches in the front row, older, 4-board benches in the back row.